 Save
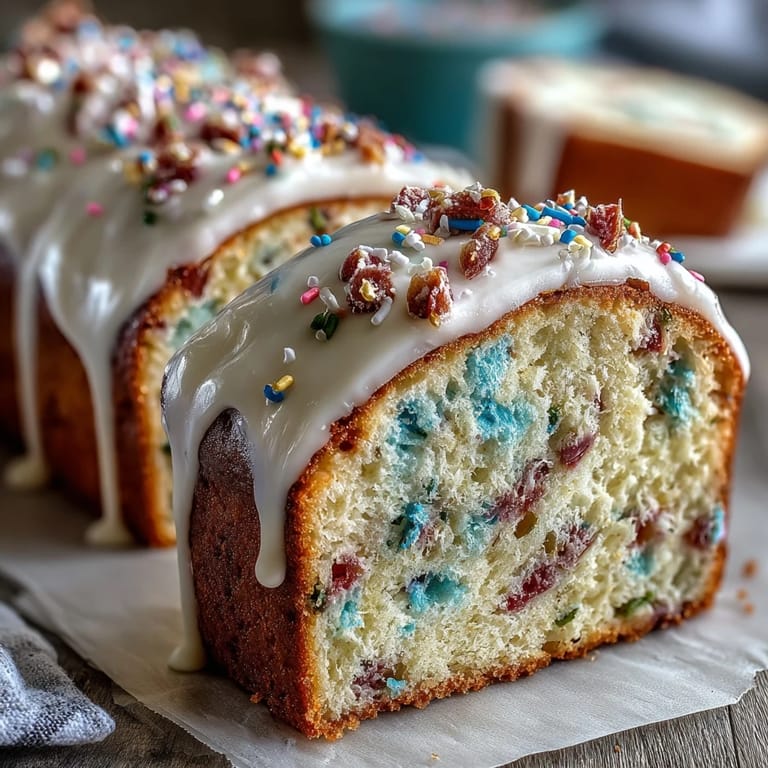
Save My sister called me in a panic two days before her daughter's birthday party, asking if I could make something that screamed spring without being too precious about it. She mentioned pastel colors, sprinkles, and wanted the cake to taste like actual cake—not just frosting vehicle. That afternoon, standing in my kitchen with afternoon light pouring across the counters, I mixed up this Funfetti-inspired creation, and watching those rainbow sprinkles tumble into the batter felt like bottling up pure joy. The result was so effortlessly cheerful that I've made it three times since, each time discovering something new about how to make it sing.
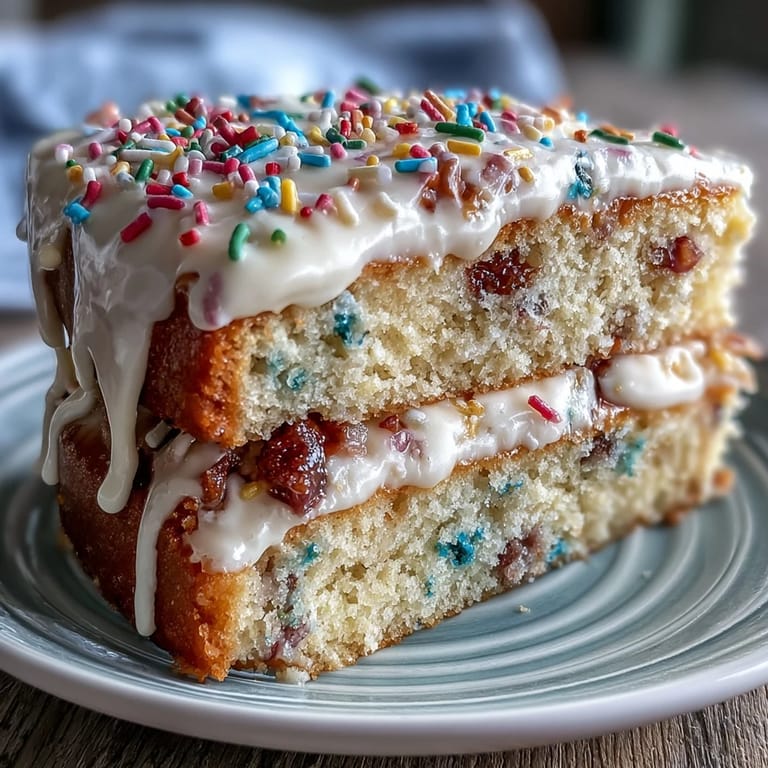
I'll never forget my nephew's face when he saw those soft pink, lavender, and butter yellow swirls on top—he actually paused mid-run to stare at it before asking if it was too pretty to eat. That's when you know you've nailed it. We ended up taking approximately seven hundred photos before cutting into it, and honestly, the taste lived up to the looks.
Ingredients
- All-purpose flour: The 315 grams gives you structure without being heavy—measure by weight if you can, as it's more forgiving than scooping.
- Baking powder and baking soda: Together they create lift and tenderness; don't skip the sour cream or you'll lose the chemical balance that makes this cake special.
- Unsalted butter: Room temperature is non-negotiable here—cold butter won't cream properly and you'll end up with a dense cake instead of the fluffy dream this should be.
- Granulated sugar: The 300 grams creams with butter to trap air, which is your entire foundation for a tender crumb.
- Eggs: Room temperature eggs blend seamlessly into the creamed butter and sugar, preventing lumps and incorporating evenly.
- Sour cream and milk: This combination is the secret to keeping the cake moist without making it taste heavy or gummy as it sits.
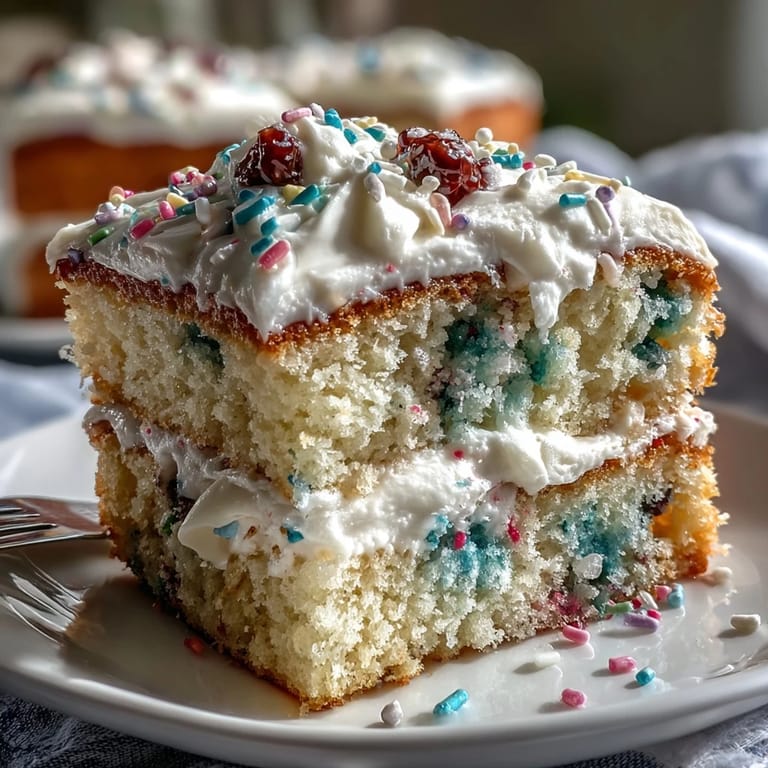
- Rainbow sprinkles (jimmies): Use actual jimmies, not those tiny ball sprinkles—they distribute evenly and add visual pop without getting lost in the batter.
- Powdered sugar and butter for buttercream: Sift the powdered sugar first, trust me on this, it prevents lumps that feel sandy in your mouth.
- Food coloring gels: Gel colors give you true pastels without watering down the frosting like liquid colors do.
Tired of Takeout? 🥡
Get 10 meals you can make faster than delivery arrives. Seriously.
One email. No spam. Unsubscribe anytime.
Instructions
- Get your mise en place ready:
- Preheat your oven to 350°F and grease two 9-inch pans with a quick spray or butter swipe, then line them with parchment so the cakes release without sticking. Bring everything—eggs, milk, sour cream, butter—to room temperature by leaving them out for about 20 minutes; cold ingredients don't blend smoothly and you'll end up with an uneven crumb.
- Combine your dry ingredients:
- In a medium bowl, whisk together the flour, baking powder, baking soda, and salt until they're evenly distributed. This simple step prevents pockets of baking soda from creating bitter spots in your finished cake.
- Cream the butter and sugar:
- Beat them together for a full 3 minutes until the mixture is pale, fluffy, and looks almost like wet sand—this incorporates air and creates the tender crumb you're after. You'll know it's ready when you lift the beaters and it forms soft peaks.
- Add eggs one at a time:
- Drop in each egg and beat well after each addition so it fully incorporates before you add the next one; this prevents a greasy, separated batter. Once all four are in, mix in your vanilla extract until the batter looks smooth and glossy.
- Prepare your milk mixture:
- In a small bowl, whisk together the milk and sour cream until combined; this simple step ensures even distribution when you fold it into the dry ingredients.
- Alternate wet and dry carefully:
- Add the flour mixture to the butter mixture in three additions, alternating with the milk mixture and starting and ending with flour—this prevents overmixing, which would develop gluten and make your cake tough. Mix just until you don't see any white flour streaks.
- Fold in the sprinkles gently:
- Use a rubber spatula to gently fold in the rainbow sprinkles with just a few turns; over-stirring at this point risks breaking them and bleeding color everywhere. The batter should look festive and speckled.
- Divide and smooth:
- Pour the batter evenly between your prepared pans and smooth the tops with an offset spatula so they bake evenly. A level top means an even cake, which is easier to frost.
- Bake with patience:
- Pop them into the oven for 28 to 32 minutes, checking around the 28-minute mark with a toothpick inserted in the center—it should come out clean or with just a few crumbs, not wet batter. The tops should be pale golden and spring back slightly when you touch them gently.
- Cool with intention:
- Let the cakes sit in their pans for 10 minutes—this prevents them from cracking or falling apart—then run a knife around the edges and turn them out onto wire racks. Cool completely before frosting, or the buttercream will melt right off.
- Beat the buttercream base:
- In a clean bowl, beat your room-temperature butter for about 2 minutes until it's completely smooth and creamy. This is your foundation.
- Incorporate powdered sugar gradually:
- Add your sifted powdered sugar on low speed so it doesn't cloud your kitchen in white dust, mixing until it's just incorporated. Once it's combined, add your milk, vanilla, and salt.
- Whip it to clouds:
- Turn the mixer to high and beat for 2 to 3 minutes until the frosting is light, fluffy, and almost doubled in volume. This is when it transforms from dense to dreamy.
- Divide and color:
- Scoop the buttercream into four bowls and add just a touch of each pastel gel color, stirring gently until the color is even. Go slowly with the coloring—you can always add more, but you can't take it back.
- Assemble and decorate:
- Place one cooled cake layer on your serving plate, dollop or pipe on your colored buttercreams in stripes or swirls, then top with the second layer. Frost the top with more colored frosting, swirling the colors together for that dreamy marbled effect everyone will photograph.
 Save
Save There's something about watching someone's face light up when they see pastel buttercream swirls on a cake they're about to eat—it's a small magic moment, really. This cake has that effect, and I've come to realize that's exactly what spring celebrations should feel like.
The Secret to Perfect Sprinkle Distribution
The reason I fold sprinkles in at the very end instead of mixing them in earlier is that I learned the hard way that overstirring causes them to dissolve slightly and bleed color. A gentle fold with just three or four turns keeps them visible and vibrant throughout the cake, creating those delightful pops of color in every bite. Once you see the difference it makes, you'll never go back to stirring them in early.
Room Temperature Is Everything
The first time I made this cake in a rush using cold butter and eggs straight from the fridge, I ended up with a cake that looked curdled and separated—it baked into something dense and unpleasant. Now I pull everything out about 20 minutes before I start, and the difference is honestly night and day. The batter emulsifies smoothly, the crumb bakes up tender, and the whole experience feels effortless rather than stressful.
Decorating with Pastel Gels Like a Pro
The first time I used liquid food coloring on buttercream, I ended up with frosting that looked pretty but felt slightly grainy and separated—I later learned that gels are concentrated and don't add water, which means your frosting stays silky. Now I keep a small palette of pastel gel colors on hand specifically for this cake, and the frosting stays smooth and pipeable.
- Start with just a tiny dab of gel on the end of a toothpick, then stir and judge the color before adding more.
- If your frosting breaks or looks separated after coloring, beat it on high for another minute and it should come back together.
- Swirl colors together on the cake while the frosting is still soft, or you'll tear the crumb trying to move it around.
 Save
Save This cake is your permission slip to celebrate spring without overthinking it—bake it for a birthday, a brunch, or just because Tuesday feels like it deserves pastel buttercream. It's the kind of cake that tastes as joyful as it looks.
Recipe FAQs
- → What type of sprinkles works best for vibrant color?
Use jimmies-type sprinkles to prevent color bleeding and maintain vibrant bursts throughout the cake.
- → Can I substitute sour cream in the batter?
Yes, Greek yogurt can be used as a substitute for sour cream to keep the cake moist and tender.
- → How do I achieve the pastel colors in the buttercream?
Divide buttercream into separate bowls and gently tint each with pastel food coloring gels such as pink, blue, yellow, and purple.
- → What is the ideal baking temperature and time?
Bake the cake pans at 350°F (175°C) for 28 to 32 minutes or until a toothpick comes out clean from the center.
- → How should the buttercream be applied for best results?
Once the cakes are cooled, pipe or dollop the pastel buttercream onto the layers and gently swirl for a marbled effect.